I was asked yesterday by a colleague for ideas on how to allow FileMaker server to manage content which could be shared publicly using its built-in web server.
We chatted about the possibility of writing content into the web root folder, but that would have meant using a plugin and being confronted with security issues because of the way in which FileMaker has limited access to folders – on the server it’s limited to the Documents and Scripts folders.
On Windows FileMaker server configures IIS while on macOS it installs an instance of the httpd web server. Both of these have the ability to create ‘virtual’ content folders. Thus if we configure the web server to have a virtual folder which exists inside the FileMaker server Documents folder we can solve this problem without permissions issues and regular FileMaker script steps can create sub folders, export container content, write files etc which become immediately web accessible.
As a side note – if you decided to head down this route, remember that everything which is in such a folder is available to everyone – no authentication, no access control, just sitting out there in a public web folder. In this specific situation that was exactly what was wanted, but that may not always be the case.
We also considered using the Data API, but that would have meant everything had to be in containers which may not always be appropriate, and also comes with the issue of authentication!
Adding a virtual folder
To get this up and running on a Windows FileMaker server takes a few steps.
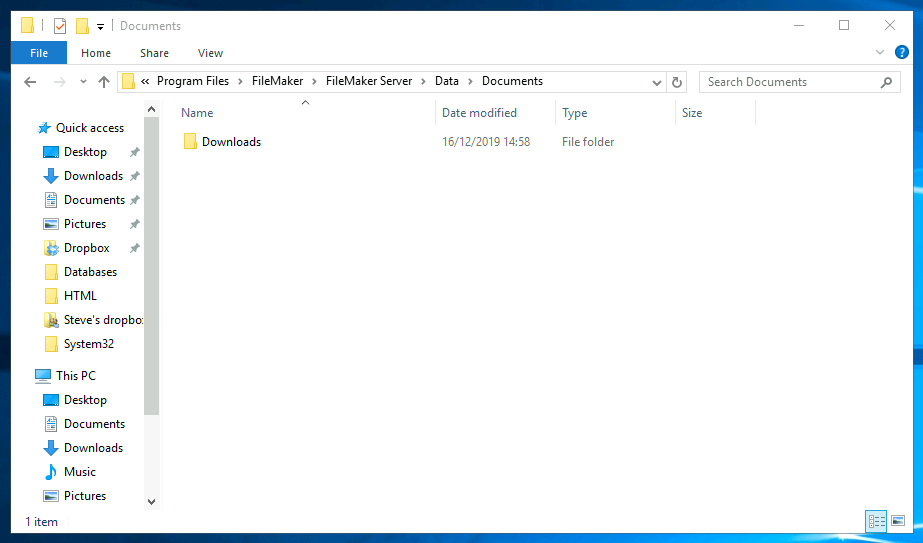
- Create the folder you want to use in the FileMaker Server Documents folder, by default that's at
C:\Program Files\FileMaker\FileMaker Server\Data\Documents. In this case I've called it 'Downloads' since that describes its purpose quite well.
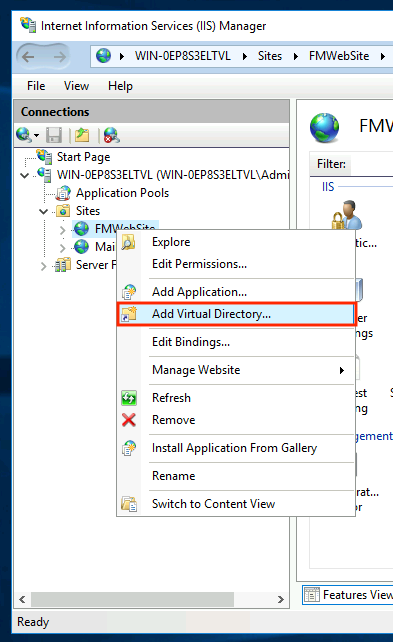
- Next we need to launch 'Internet Information Services (IIS) Manager' - you can find this under Administrative Tools. Once it opens, expand the computer name on the left, then sites, and you're looking for the site called
FMWebSite. If you've followed FileMaker best practice that should be the only site running on that server, which isn't quite how things are on this development server of mine!

- Right-click on this server, and select 'Add Virtual Directory'
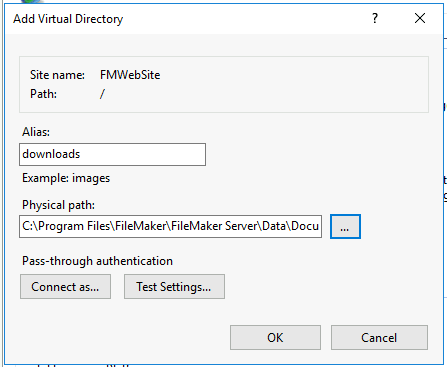
- In the resulting dialog, give the virtual directory an alias - I'd suggest this should match what you called the folder, so I named this 'downloads'. Use the triple dots to the right of the Physical path field and navigate to the folder you created.
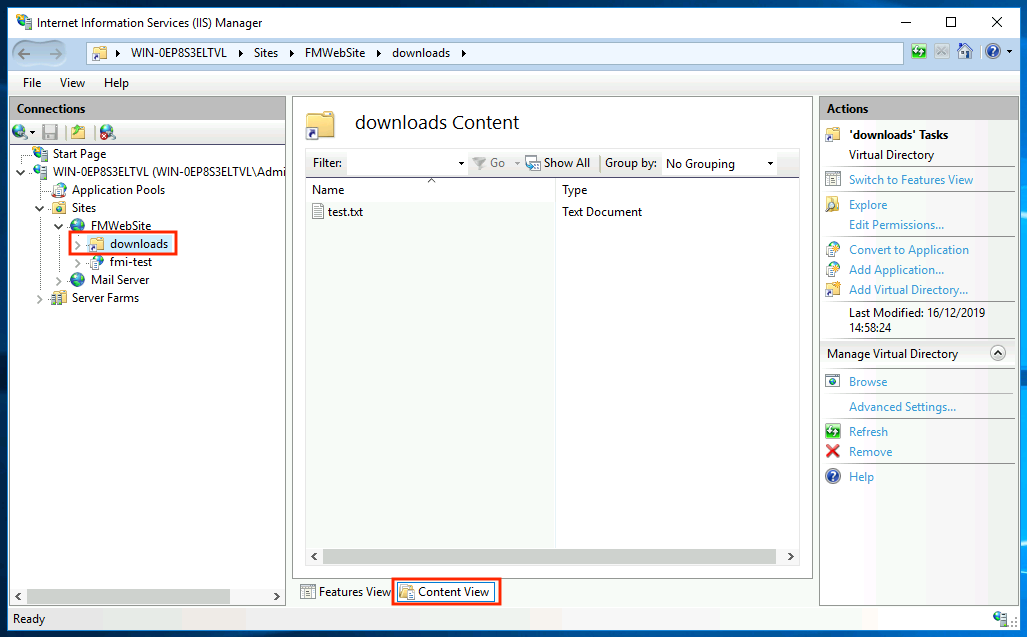
- Ok, that dialog out of the way, and you're done! You should now see the new virtual directory listed and you can access the content using
https://your.fms-server.com/downloads/the-file-in-there.txt. If you select the folder in IIS, then the Content View from the bottom of the IIS manager you can see the files which are contained in there.
There's no GUI to manage the instance of httpd which FileMaker server installs but we don't actually need one because the process is somewhat simpler in the macOS world.
- Begin by navigating to the FileMaker server Documents folder. In a finder window CMD-Shift-G to 'go to a folder'. By default the path is
/Library/FileMaker Server/Data/Documents. Right click, New Folder, and add your folder. I've called thisDownloadssince it matches the purpose we're trying to achieve. - Now we need to open a terminal and create something called a symlink, or symbolic link, to the correct location. You can find Terminal under Applications > Utilities. Enter each of these commands
cd /Library/FileMaker\ Server/HTTPServer/htdocs/httpsRoot
ln -s ../../../Data/Documents/Downloads/ ./downloads
sudo chown fmserver:fmsadmin ./downloads
By way of explanation
- change directory to the https document root for the web server
- create a symlink which links to the Downloads folder we created above, and call it 'downloads' locally. You'll want to adjust those names to suit your use-case
- ensure that symlink is owned by the correct user - you will be asked to provide your password at this point
- Back to finder, we now need to modify the httpd.conf file. Navigate to
/Library/FileMaker Server/HTTPServer/conf/extraright click onhttpd-ssl.confand select Open With > TextEdit - On line 81 you will find
#   General setup for the virtual host
DocumentRoot "${HTTP_ROOT}/htdocs/httpsRoot"
ServerName "${SERVER_NAME}"
ServerAdmin you@example.com
ErrorLog "||/usr/sbin/rotatelogs '/Library/FileMaker Server/HTTPServer/logs/ssl_error_log' 10M"
TransferLog "||/usr/sbin/rotatelogs '/Library/FileMaker Server/HTTPServer/logs/ssl_access_log' 10M"
Immediately after that add the following
<Directory "${HTTP_ROOT}/htdocs/httpsRoot">
    Options FollowSymLinks
</Directory>
This allows httpd to follow any symlinks which you place into the httpsRoot folder, which is exactly what we just did above.
- Finally back to Terminal and we need to restart the FileMaker instance of httpd, this can be achieved with.
sudo /Library/FileMaker\ Server/HTTPServer/bin/httpdctl gracefulAgain, you may be asked for your password to complete this.
- That's it - try it out by dropping a file into the Downloads folder which you can then access via
https://your.fms-server.com/downloads/the-file-in-there.txt
Try it out
There’s a version of this currently running on our FMS which you can try out (assuming you’ve got FileMaker client installed). The version on the server is locked down, however you can also download a copy to see how we’re dealing with container export on server (which isn’t generally supported, but can be achieved using the FMS 18 File handling functions).
Clever little use of the Data File steps there…
Need to be aware of the little line in the help
>>The maximum amount of data this script step can write at a time is 64 MB. If the data to write is larger than 64 MB, you can perform this script step multiple times, writing an amount no larger than 64 MB each time.
This would need to be accounted for..
December 18, 2019 at 11:19 amThanks John – and yes, good point – keeping track of the size of the file and chunking data out may be necessary in some use cases…
December 18, 2019 at 11:37 amI’ve been using this technique to automatically publish product images for an e-commerce store. I was surprised how easy it is to publish external container data, until I realized that the actual file name stored on disk can have a suffix appended if more than one file with the same name is inserted. You can capture the actual file name, but it’s a PITA. It’s far better to export the images first.
December 19, 2019 at 9:01 pmHi Steve – thanks for sharing this. Just wondering how you deal with accumulating files in the FileMaker Server\Data\Documents\Downloads folder that you’re populating? Do you have a way to clean these up/remove them if they are no longer required? Was wondering about a scheduled script that could be run here if that was possible to delete old files no longer needed?
May 20, 2020 at 11:57 pmFor the original use-case nothing is being done about them, since references are being emailed to people to those files so the expectation remains that they will always be accessible from the links sent. Clearly that’s not going to be the case ‘for ever’ but certainly they’ll be maintained for several years – storage is cheap these days. We do need to remember to check when we upgrade FMS that it hasn’t removed the symlink / rules put in place – something we’ll be doing in a few weeks now that FMS 19 is out.
If you do want to ‘tidy up’ you could definitely use a scheduled script for this task. You’d have to keep track of which files need to be deleted, and when, in some way – perhaps write to a table at the time the file is created on disk with a ‘DeleteAt’ timestamp in that table. You could then query that table every x hours / days and use the
Delete Filescript step to remove the files.As an alternative to storing when the file should be deleted in a table, you could use the Base Elements plugin and their
May 21, 2020 at 6:47 amBE_FileModificationTimestampto determine when a file was last modified and if it’s more than x days / weeks / months ago then delete it.